How to set up your Powermax45 XP plasma cutter
The Powermax45® XP is a highly versatile and powerful plasma cutting system. It is designed for cutting, gouging, and marking metal with either a handheld or mechanized torch. The system is easy to set up and operate, but it is important to follow all safety instructions mentioned in the operator manual or illustrated on the label on the top of the system. It is extremely important that operators fully understand and follow prevention methods to guard against electrical shock and protect their skin, ears, lungs, and eyes.
This video will focus on handheld operations using the Powermax45 XP, since these are the most common applications for this model.
Setting up the Powermax45 XP using the Duramax® lock handheld torch
Setting up the system for cutting with the Duramax lock handheld torch can be done in six steps.
-
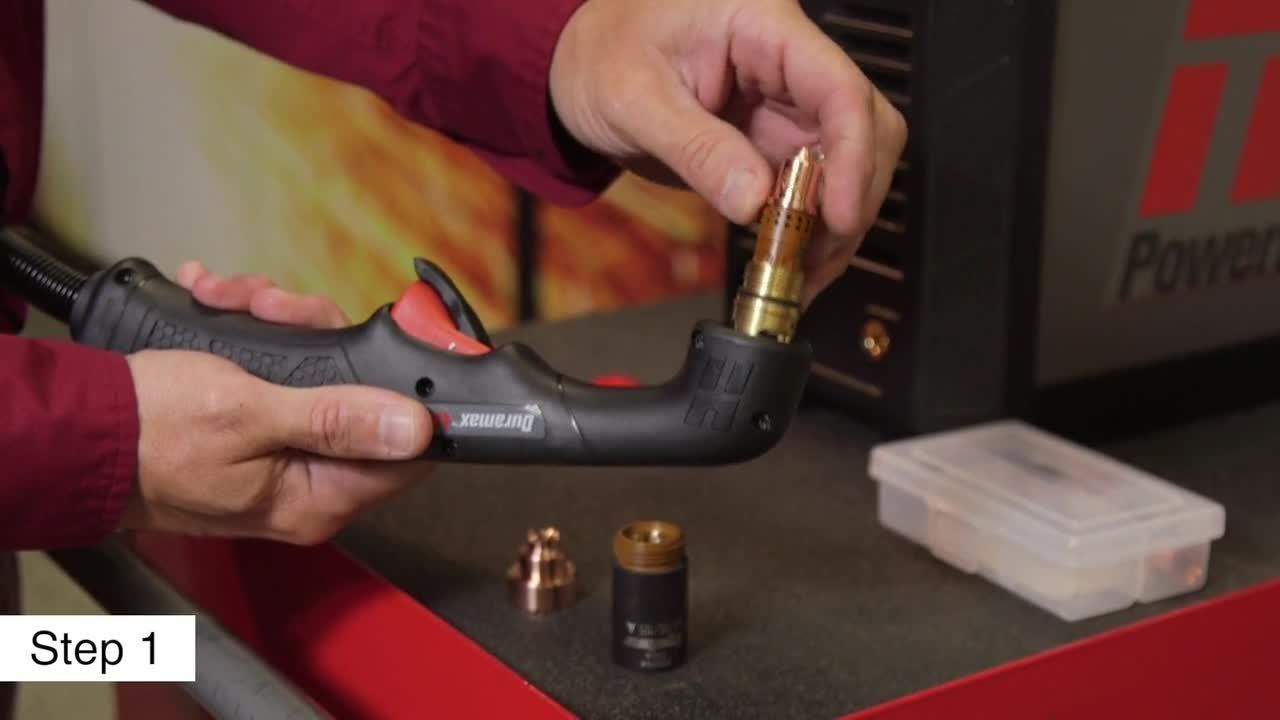
Install the consumables onto the torch. Start by inserting the swirl ring, then the electrode, followed by the nozzle. Screw the retaining cap on until finger tight, then add the drag shield.
-
Slide the torch disable switch forward to the green position.
-
Attach the torch to the power supply.
-
Depending on the installation or the model purchased, an air fitting may need to be installed. If this is the case, refer to the operator manual for sealant information and torque values. Once the air fitting is installed, attach the gas hose.
-
The gas can be compressed air, bottled air, nitrogen, F5, or argon for marking applications.
-
Compressed air should be filtered to remove all dirt, water, and oil, because contaminants can damage the power supply, torch, and consumables.
-
The minimum gas pressure for cutting is 85 psi or 5.9 bar and should not exceed 135 psi or 9.3 bar.
-
-
Attach the work lead to the power supply and to the metal to be cut. Rust, paint, or coatings must be removed to ensure the clamp has a good electrical contact. The clamp should never be attached to the portion of the metal that will fall away.
-
Plug the power cord into the proper receptacle, then power on the system. Depending on the model, you may need to install a plug or the system may need to be hardwired to a power source. This electrical work must be done by a licensed electrician.
The Powermax45 XP is now set up for handheld cutting.
Setting up the control panel
There are only two adjustments needed for operation on the plasma cutter control panel: output current and mode selection.
-
To adjust the output current, turn the knob to the right to increase the amperage or to the left to decrease the amperage. The output range is from 10 to 45 amps.
-
To select the operating mode (cutting or gouging), press the mode button to toggle between the two processes. By default, the display shows the output current.
You can adjust the gas pressure by pressing the mode button while turning the knob to manually adjust the gas pressure for the operating mode that's active. The display changes from showing output current to gas pressure while the button is depressed.
To change how the gas pressure is displayed (psi or bar), press and hold the mode button for about 15 seconds until the display changes. Release the mode button and the system will switch pressure values from psi to bar or from bar to psi.
The Powermax45 XP plasma cutter has Smart Sense Technology, so it will automatically adjust the air pressure factoring in the torch lead length and the operating mode. This ensures the system is always set up correctly.
In the event that there is an error with the system, the display may show a fault code and one or multiple LEDs will illuminate. If this happens, refer to the troubleshooting section in the operator manual for more information.
Cutting 5/8 inch (16 mm) thick plate metal
To cut 5/8-inch thick metal:
-
Set the operating mode to cutting.
-
Set the output current to 45 amps. If you are cutting thin metal, the output current should be lowered for improved consumable life and cut quality.
-
To perform an edge start, hold the torch vertically just off the edge of the workpiece.
-
Check the torch disable switch to see if it is green, indicating the torch is ready to fire.
-
Flip the black safety trigger forward and press the red torch trigger. The torch will emit several puffs of air in quick succession. This is an audible indication that the next time the torch trigger is pressed the torch will be active and will fire an arc.
-
Note: This will only happen after engaging the torch disable switch or unscrewing the consumables.
-
-
Press the trigger again to start the pilot arc, which will transfer to the workpiece and become the cutting arc.
-
Pause at the edge until the arc has completely cut through the workpiece, then proceed with the cut. Holding the torch tip perpendicular to the workpiece as well as maintaining the proper travel speed is key to successful cutting.
-
Watch the arc beneath the plate. Sparks should exit the workpiece at between a 15-to-30-degree angle.
-
If the sparks are perpendicular to the workpiece, then the speed is too slow.
-
If the sparks are spraying up from the workpiece, then the speed is too fast or the system does not have sufficient power.
-
-
To ensure a complete cut (particularly on metal that is 5/8 inch thick or greater) when nearing the edge, angle the torch by lifting the handle but keeping the tip on the metal. That allows the arc to come out first before the tip reaches the end of the piece.
You can use a torch cutting guide, straight edge, or template to help the cutting process. You must factor in the distance from the shield center to the edge when creating a template for placement of a cutting guide.
Bevel Cutting
Bevels can be cut at many different angles and configurations depending on the purpose. If you are making a bevel cut, the material thickness increases proportionally with the bevel angle. This needs to be factored in when determining the torch travel speed and amperage output.
Piercing
If you need to start a cut away from the edge of the metal, you need to pierce the workpiece. The piercing capability of a system is typically half the maximum cut capacity.
Depending on the thickness of the metal being pierced, there are three piercing methods:
-
To pierce thin metal, hold the torch on the metal and press the trigger to transfer the arc.
-
To pierce thick metal, hold the torch at an angle so that the nozzle is within 1/8 inch from the workpiece. Press the trigger to transfer the arc, then slowly rotate to an upright position.
-
If the gouge left from the rolling technique is not desired, then hold the torch about 1/2 inch above the metal and press the trigger to transfer the arc. Once the arc has penetrated the metal, place the torch on the surface and proceed to cut.
Note: It is recommended that the rolling technique be used on thick metal to minimize damage to the consumables caused by the blowback of molten metal.
Cutting Expanded Metal
To cut expanded metal, or metal with a lot of holes or gaps, simply follow the same procedure as outlined for plate cutting.
Gouging
Gouging removes unwanted metal from the workpiece without piercing or severing it. You use the torch to melt surface metal and blow the molten metal away from the workpiece.
To gouge using the Powermax45 XP:
-
Slide the torch disable switch to the yellow position.
-
Install the maximum control gouge nozzle and gouge shield.
-
Slide the torch disable switch to the green position.
-
Press the mode button so the gouge LED illuminates. To get a wide diffused arc for gouging, keep the current output set at 45 amps.
-
Hold the torch at a 40-degree angle from the workpiece with a small gap between the torch tip and the workpiece.
-
Press the trigger to activate the torch, then again to transfer the arc.
-
Maintain this angle and move the torch along the workpiece to remove unwanted metal or weld.
More metal can be removed by making another pass or using a weaving technique. For different gouge profiles, the output amperage, torch angle, torch-to-work standoff, torch speed, and gouging nozzle type all have an effect. Refer to the gouging section in the operator manual for detailed information.
If a narrower arc is desired, lower the current output. If you lower the amps to 25 or less, we recommend using the optional precision gouging nozzle and shield, which are sold separately. This specialized part is ideal for applications where precise amounts of metal need to be removed, such as around spot-welds, marking for part identification, score lines for bend or weld locations, and creating dimples for drill starts.
Maximizing cut and gouge quality
Cut and gouge quality, as well as consumable life, are very important factors for operators. There are a number of things that will determine cut and gouge quality, as well as how long the consumables will last. Air quality, piercing technique, length of cutter gouge, operator skill, material thickness, and material type all play a role in consumable life. Cut and gouge quality is also impacted by operator skill, the condition of the consumables, the use of correct consumable parts for the operating mode, and the proper overall system maintenance (including its gas filter).
Hypertherm offers a variety of specialty consumables, unique hand and machine torches, cutting or gouging aides, and personal protective equipment designed to enable you to complete jobs faster, better, and safer.
For more tips on how to get the most from your Powermax plasma cutter, watch more of our how to videos. For more information about these and other Hypertherm products, contact an authorized distributor or visit our website.