7 Easy steps to set up your Powermax45®
The Powermax45 is a versatile and powerful plasma system for cutting and gouging metal. It is designed to be used with either a hand-held or mechanized torch. The system is easy to set up and operate, but it is critical for operators to follow all safety instructions mentioned in the Operator Manual or illustrated on the label on the top of the system. Plasma system operators must guard against electrical shock and protect their skin, ears, lungs, and eyes.
There are many variables involved in setting up the Powermax45 for mechanized applications that are addressed elsewhere, but this video explains how to set up the Powermax45 for manual operations.
Initial setup
Setting up the Powermax45 for manual operations can be done in seven easy steps.
-
Check for proper installation of the torch consumables.
-
First, unscrew the retaining cap to remove the parts within.
-
Replace the parts by first inserting the electrode, then the swirl ring, and finally the nozzle.
-
Screw the retaining cap back on until finger tight. Do not overtighten the cap, since that can damage the consumables and interfere with proper operation of the torch.
-
-
Connect the torch lead to the front of the power supply.
-
Pull back the quick release collar on the gas hose and insert the quick disconnect fitting. You can use either bottled nitrogen, bottled air, or compressed air. The air should be filtered to remove all dirt, water, and oil because contaminants can damage the power supply, torch, and consumables. The minimum gas pressure is 80 psi or 5.5 bar and the maximum pressure cannot exceed 100 psi or 6.9 bar.
-
Plug the power cord into the proper receptacle and power on the system. The power lamp on the front of the system illuminates when it is powered on. Depending on the model, a plug may not be attached to the power cord when you purchase it. If you have to install a plug, or the system needs to be hardwired to a power source, you must hire a licensed electrician to do the work. The data plate on the bottom of the system or in the operator manual has the input voltage requirements.
-
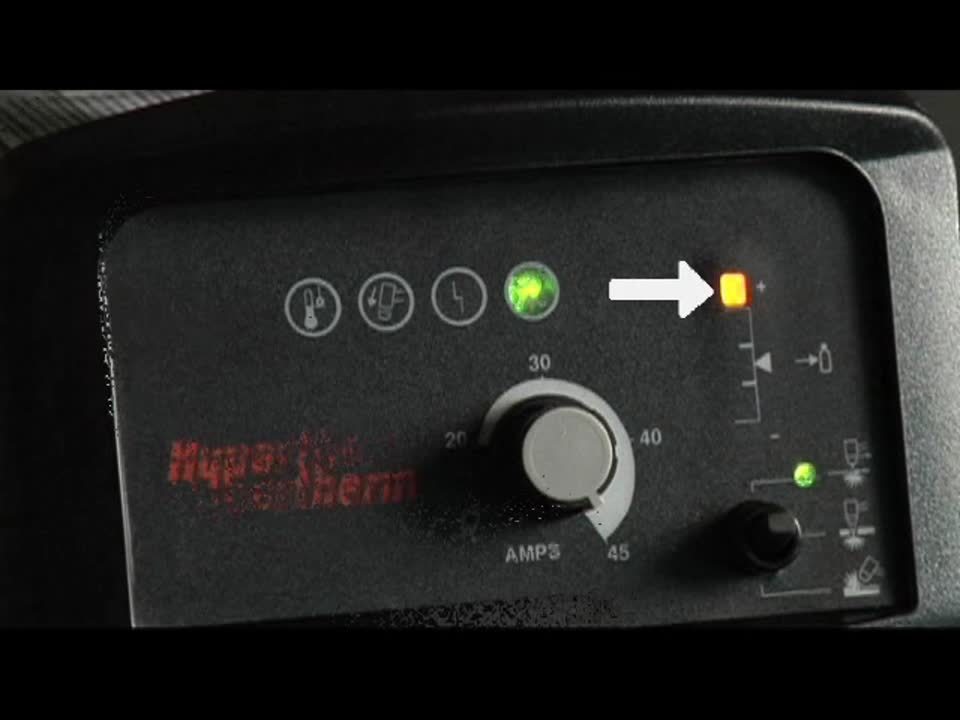
Set the mode switch to the middle setting for plate cutting. If the LED bar in the pressure gauge is illuminated green, the gas pressure is set correctly. If the LED is yellow, the gas pressure needs to be adjusted.
-
To adjust the gas pressure, turn the amperage knob all the way counterclockwise, to the gas test position.
-
Next, pull the regulator knob to unlock it.
-
Turn the knob until the green LED appears in the center of the pressure bar, then push the regulator knob to lock it.
-
-
Adjust the amperage knob to 45 amps for full cutting power. If you are cutting thin metal, you may lower the amperage for improved consumable life and cut quality. The temperature, fault, and torch cap sensor LEDs should not be illuminated.
-
Attach the work clamp securely to the work piece or the cutting table near the cut. Rust, paint, and coatings must be removed to ensure that the clamp has a good electrical contact. The clamp should never be attached to the portion of the metal that will fall away.
Optimizing hand torch operations
To perform an edge start, hold the torch vertically, just off the edge of the work piece. Flip the yellow safety trigger forward and press the red torch trigger. The pilot arc transfers to the work piece and becomes the cutting arc. Pause at the end until the arc has completely cut through the work piece then proceed with the cut. The nozzle may be placed on the work piece for ease of cutting.
If using unshielded consumables, maintain approximately 1/8 inch or 3.2 mm torch-to-work distance. When nearing the end of the cut, angle the torch into the direction of the cut allowing the arc to come out first to ensure a complete cut.
Maintaining proper travel speed is key to successful cutting. Watch the arc beneath the plate. Sparks should lag 15 to 30 degrees behind the cut. If the sparks are vertical, then the speed is too slow. If the sparks are perpendicular to the cut, or are spraying up from the work piece, then the speed is too fast or the system does not have sufficient power. Lag cuts on the finished cut edge should also be about 15 to 30 degrees.
A plasma cutting guide, straight edge, or template can be used to guide the torch; however, the distance from the shield center to the edge must be considered when creating a template or placing a straight edge. If you are beveling using an angle iron, plasma cutting guide, or free hand, remember that the material thickness increases proportionally with the bevel angle.
Piercing
The piercing capability of a system is typically half the maximum cut capacity depending on the thickness of the metal being pierced. There are two methods of piercing.
-
If piercing thin metal, hold the torch perpendicular to the work piece and pull the trigger to transfer the arc.
-
If piercing thick metal, hold the torch at an angle so that the nozzle is within 1/8 of an inch or 2 mm from the work piece. Pull the trigger to transfer the arc then slowly rotate it to an upright position.
In both methods, when sparks are exiting from the bottom of the work piece, the metal has been pierced and cutting can begin.
To prolong the life of consumables, it is recommended that the second method be used to minimize damage to the consumables caused from molten metal blowback. Avoid unnecessary starts because they reduce nozzle and electrode life.
To cut expanded metal or metal with a lot of holes or gaps, set the mode switch to expanded metal cutting which is the top position. This enables the system to automatically reinitiate the pilot arc without retriggering.
The Powermax45 is easy to set up and operate, enabling you to get to work faster. If you have any issues setting up your Powermax45, please contact Hypertherm customer support for assistance.