Powermax SYNC: Setup and operation
The Powermax SYNC™ plasma cutting system has built-in intelligence and a revolutionary single-piece cartridge consumable that simplifies system setup and operation. The Powermax SYNC streamlines consumable inventory, lowers operating costs, and maximizes cutting and gouging performance.
Powermax SYNC advantages
Companies like TEI and Industrias Metalicas Anro rely on the Powermax SYNC for its ease of use, clean quality cuts, and increased productivity.
Powermax SYNC is easy to set up and use
-
Single-piece cartridge consumables are color-coded by process to eliminate parts confusion and simplify consumable inventory management
-
SmartSYNC® torches with the Hypertherm cartridge automatically set the correct amperage and operating mode, eliminating setup errors
-
The system can handle a wide range of jobs with easily interchangeable torch styles and application-specific cartridge consumables for different types of cutting and gouging
-
End-of-life detection tells you when it is time to change your cartridge
Metal fabrication instructors use the Powermax SYNC in their programs to make it easier for students to learn. The system helps students avoid consumable loading mistakes and enables quicker part change-outs, better cut quality, and longer consumable life. It is more cost-effective because the cartridge data lets operators see when the cartridge is ready to change out, taking the guesswork out of plasma consumables.
Powermax SYNC increases your productivity
-
Simplified setup and operation minimize downtime, troubleshooting, waste, and training time
-
The advanced cartridge consumable design provides up to twice the life for hand cutting
-
Each cartridge has been designed to optimize the cutting or gouging process for optimal performance
-
Controls on the torch allow you to adjust amperage and change the consumable without returning to the power supply
-
Access to cartridge data allows performance tracking and usage pattern analysis
-
The cartridge reader accessory pairs with the Powermax SYNC smartphone app to analyze performance data such as starts, transfers, and arc-on time
Brazil’s Aço e Ferro increased productivity by 300 percent using the Hypertherm Powermax105 SYNC plasma cutter.
Powermax SYNC system requirements
Before you begin Powermax SYNC system setup, make sure you have an AC power source (fixed or generator), compressed air (shop air, portable air compressor, or bottled air), and safety equipment (including shaded glasses or face shield, gloves, and protective clothing). Always use your Powermax system with proper ventilation.
Power supply layout
Rear panel
The rear panel has the system’s On/Off switch, an inlet gas supply connection, and a pre-installed 10-foot input power cord for connecting the system to the main input power. If the power cord needs a plug added or changed, please have it done by a qualified electrician.
If you are using a Powermax SYNC with mechanized applications, you will find the optional circular plastic connector, or CPC port, and the RS-485 serial port connections on the rear panel. These connections are for use with cutting tables, track burners, pipe cutters, and other devices that require remote inputs.
All Powermax SYNC systems have a data tag on the rear panel that displays the model and serial number, as well as the input power specifications of the system.
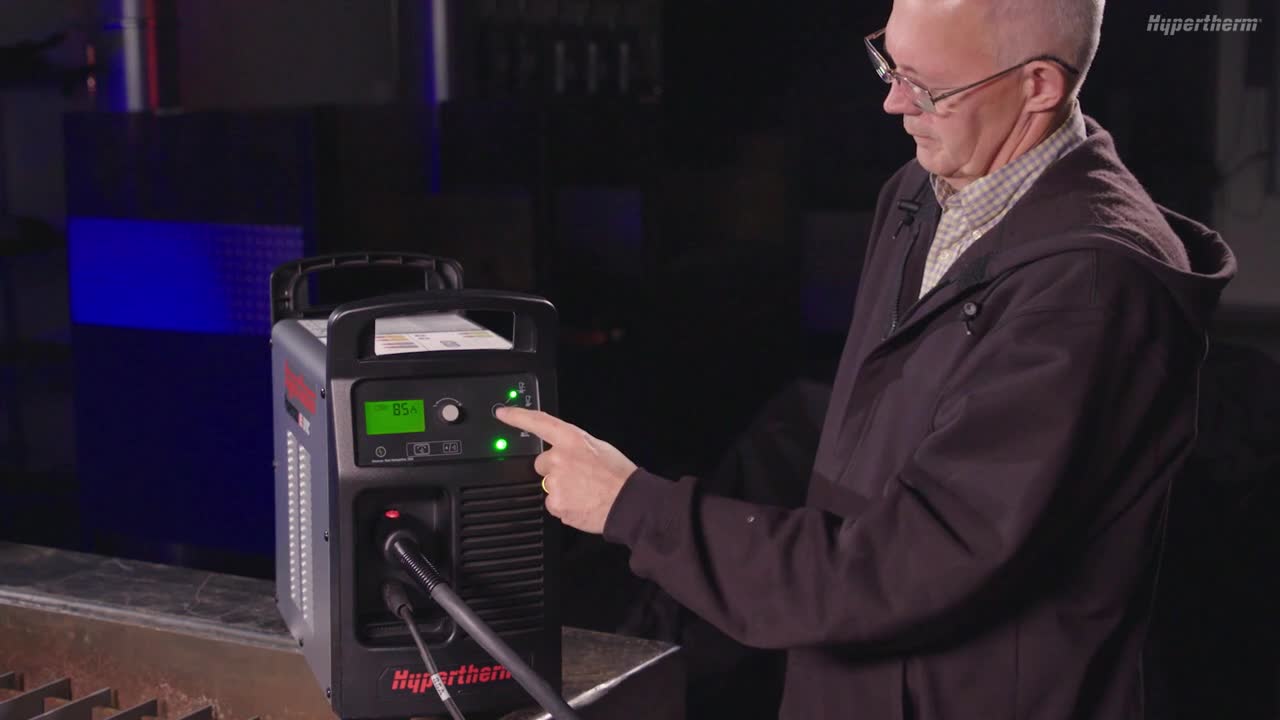
Front panel
The front panel has the main status screen and controls, the torch connector, and the work-lead connector. The Powermax SYNC status screen provides useful operator information for setup and operation. It has menu options so you can monitor cartridge life, system data, and settings.
For more information on the available menu options, please refer to the Powermax SYNC operator manual.
Powermax SYNC controls and indicators
The Powermax SYNC controls and indicators are simple to use and easy to understand.
The green power On LED indicates that the power switch is set to on and the system is ready to operate. Amperage, operating mode, and gas pressure are all set automatically. You can adjust the cutting current at any time with the adjustment knob.
If you want to adjust the gas pressure, push and hold the Automatic/Manual pressure setting mode selector until the green LED comes on, indicating you are now in manual mode. This allows you to make manual changes to the gas pressure using the adjustment knob. When you are ready to leave manual mode, push the Automatic/Manual pressure setting button again to go back to automatic mode.
The Operating mode LEDs are automatically set when a cartridge is installed. The mode button can be used to switch between cut modes for applications such as expanded metal or metal grating.
The yellow fault LED indicates that there is a fault with the power supply. Refer to the operator manual for fault code descriptions if your fault LED is yellow.
How-to install the SmartSYNC™ torch
The included SmartSYNC torch can be installed onto the power supply by inserting the FastConnect™ into the torch receptacle until it clicks into place.
Once connected, you will notice an integrated lock switch on the torch. This lock switch disables the torch and prevents the torch from firing accidentally when the power supply is on. This safety feature is useful when you need to change the cartridge or when you need to move the power supply or torch while the system is on.
The torch has two status LEDs:
-
The multi-colored LED indicates when the torch is ready to fire, when it is locked, or if a severe fault condition has occurred
-
The status LED indicates when a gouging cartridge has been installed
The SmartSYNC hand torch also lets you adjust the amperage from the torch. Simply push the button on the current-adjustment control to adjust the current setting to a preset amperage. The amperage for each setting varies based on the Powermax SYNC cartridge and system being used.
To install the work-lead cable, insert the end of the work cable into the connector on the front panel of the Powermax SYNC. Turn the cable to the right until it is locked in place.
Complete setup
To complete setup and operation of the Powermax SYNC:
-
Plug the system into the appropriate power and add an air source that meets the system’s requirements
-
Power the system on and ensure the SmartSYNC torch and work-lead cable are properly installed
-
Attach the work clamp to a table or work piece and install a cartridge
You are now ready to use the system.
Always wear the appropriate personal protective equipment when operating a Powermax SYNC.