Powermax pressure faults for systems over 50 amps
Three Easy Steps to Fix Air Pressure Faults
This video will help you identify the 0-12 low input gas pressure warning and the 0-20 low gas pressure fault for the Powermax65®, 85, 105, and 125 models. Both the 0-12 warning and the 0-20 fault occur when input gas pressure is low.
0-12 fault
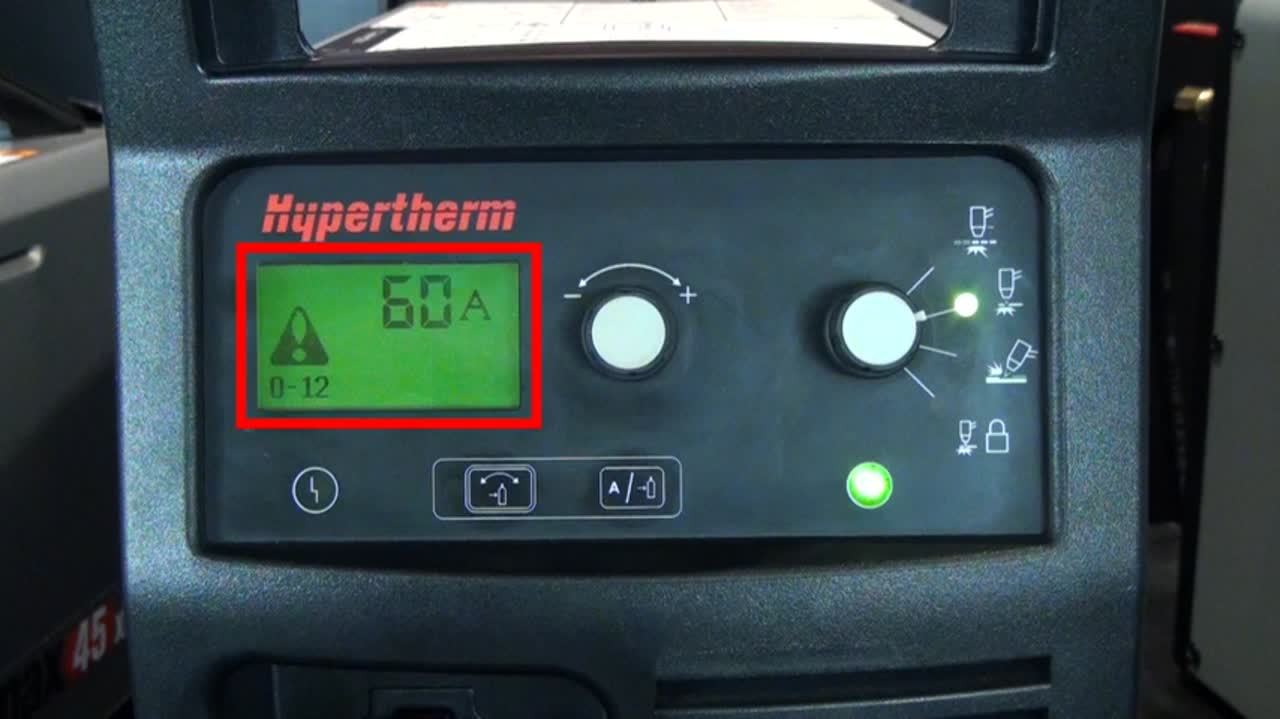
In the Powermax65, 85, 105, and 125 systems, symptoms of a 0-12 low air pressure warning include poor cut quality, slower cutting speed, or the arc misfiring. If you notice any of these symptoms, start by checking your machine’s front panel display for the 0-12 fault code and icon. The 0-12 fault code will be located in the lower-left corner of the LCD screen of your Powermax.
The 0-12 fault code is a warning that there is low input gas or an unstable gas pressure condition, but it is not a fault condition. Since the 0-12 fault serves as a warning only, your machine will continue to operate.
To correct the 0-12 fault, first confirm that the torch lead is not pinched, bent, or caught on something in your shop. Also check for leaks. If you find a problem with the torch lead, fix that issue and see if that clears the code.
Next, check the pressure gauge at the gas source to verify that the output setting is correct. Reference your operator manual for the correct pressure setting. If you determine that the incoming gas pressure is too low, increase the pressure to the acceptable range while gas is flowing dynamically. Dynamic pressure refers to the gas pressure that is flowing through the system. A dynamic pressure is needed to obtain accurate input gas pressure to supply the system.
To set the incoming gas pressure properly, you must access the service screen and put the system into gas test mode. To access the service screen, move to the front of the unit and push and hold down the Automatic Manual Pressure Setting Mode Selector and the Current Gas Selector buttons for two seconds.
Once you are in the service screen, find the blinking cursor located in the top left corner of the screen. Move the cursor through the service screen by pressing the Automatic Manual Pressure Setting Mode Selector or the Current Gas Selector buttons.
Move the cursor so it sits between the G and the 0 on the second row. Turn the adjustment knob clockwise. The G0 will turn into a G1 and gas should start flowing from the torch. Once gas is flowing, check the pressure setting at the gas source and adjust as needed. When the gas pressure is within the operating range, the gas pressure fault and icon will clear and the torch will continue to operate.
If you are still having issues, you can place an inline pressure gauge on the gas inlet found on the back of your Powermax. This can help you determine if the input gas supply is stable during both static conditions and when the arc is cutting. If the gas supply is not stable during both static and dynamic situations, fix the instability issue and see if this clears the fault code.
0-20 fault
With the 0-20 low gas pressure fault, symptoms include the torch not firing combined with the 0-20 fault code and an icon being displayed on the status screen. The 0-20 fault code will be located in the lower-left corner of the LCD screen of your Powermax.
Start by checking the pressure gauge setting at the gas source while gas is flowing dynamically. If the input pressure from the gas source is correct, the output gas pressure can be located in the service screen. To access the service screen, move to the front of the unit and push and hold down the Automatic Manual Pressure Setting Mode Selector and the Current Gas Selector buttons for two seconds.
The set and actual pressure values are on the second row, in the format “P number/number.” The set pressure value is the number on the left and is known as the static pressure. This is the reading when gas is not flowing through the system. The number on the right is the dynamic output pressure reading.
To check the dynamic output pressure of the system in the service screen, move the cursor by pressing the Automatic Manual Pressure Setting Mode Selector or the Current Gas Selector buttons. Move the cursor so it sits between the G and 0 on the second row. Turn the adjustment knob clockwise. The G0 will turn into a G1 and gas should start flowing from the torch.
The dynamic output pressure reading should be within 1 to 2 psi of the set point pressure. If the pressure is more than a 2-psi difference from the set point pressure, check for kinks, leaks, or restrictions in the inlet gas line. If no leaks or kinks can be found with the inlet gas line, the air filter element needs to be inspected.
Inspecting the air filter
To inspect the air filter element, turn the power off, disconnect the power, and remove the gas supply line. Remove the air filter bowl following the instructions in your operator manual. Inspect the filter for oil or other debris that may cause restrictions in gas flow. If the element is dirty, replace it with a new Hypertherm air filter. Wipe away any oil or other contaminants that have collected inside the filter bowl.
Also examine the O-ring at the top of the filter bowl for cracks or tears and replace it if it is damaged. Reattach the filter bowl, reconnect the gas supply and power, and turn the machine on. This should clear the 0-20 fault code and icon.
If the 0-12 or 0-20 fault codes persist, contact your Hypertherm distributor or authorized repair facility for assistance.
Air pressure faults are one of the most common faults Powermax users encounter. Knowing how to quickly evaluate potential causes for air pressure issues and resolve them enables you to reduce downtime and avoid operating with poor cut quality and slower cutting speeds.
To avoid unplanned cutting interruptions, practice regular maintenance of your Powermax machine to keep your system in good condition. Air filters should be inspected and replaced using the maintenance schedule outlined in your operator manual.