HPR cartridge torch maintenance and rebuild instructions
How to extend HPR torch life with regular maintenance
Regular maintenance is important for your plasma system and its components. Regular maintenance keeps your plasma system running optimally and extends the life of both your cutting system and your cartridge consumables. It also reduces the likelihood of emergency repairs and unplanned downtime, improving productivity, and keeps cut quality high.
Your routine maintenance contains two components, cleaning and inspecting parts on a scheduled basis and replacing parts that wear or break with use. Your owner’s manual outlines all recommended maintenance for your plasma system. This video provides an overview of HPR® cartridge torch maintenance, including routine maintenance schedules and instructions for rebuilding the HPR cartridge torch.
Easy consumable maintenance
Traditional plasma cutters use five different parts — shield cap, retaining cap, nozzle, electrode, and swirl ring. To inspect the system, you need to disassemble it, inspect all five parts, determine which parts are worn, replace the worn parts, and reinstall them in the torch. Every inspection requires carefully disassembling and reassembling the consumables in the correct order and orientation.
The HPR torch uses Hypertherm’s HPR cartridges. One single-piece cartridge replaces the five standard consumables, so individual inspection and replacement of each part is not required. The cartridge is designed so all five components wear at the same rate, ensuring consistent cut quality for the life of the cartridge. When the cartridge needs to be replaced, it can be swapped for a new one in seconds. You simply remove the single cartridge, grab a new one, install the new cartridge in the torch, and get back to work.
O-ring maintenance
All regular maintenance tasks for the HPR cartridge torch are related to lubrication and cleanliness.
Every time you install a new cartridge, you should lubricate the two O-rings on the cartridge shield. If you are installing a used cartridge, verify that the O-rings on the shield are free of debris and have adequate lubrication. An O-ring with adequate lubrication will look shiny without excess or visible lubricant. Be careful not to use too much lubricant. Too much lubricant can cause clogging and metal dust contamination in the torch, leading to uncontrolled arcing in the plasma chamber and torch failure.
The other components that require frequent lubrication are the four O-rings on the front end of the torch head and the O-ring on the retaining cap. Ideally, these O-rings should be lubricated every time a new cartridge is installed.
The four bullet connector O-rings and the center O-ring on the rear of the torch also require routine lubrication, but these O-rings can be lubricated less frequently. They should be checked every time the torch is removed.
Rebuilding the torch: use the torch-rebuild kit (528106) for regular torch maintenance
The HPR cartridge torch has a long-term preventative maintenance schedule. In this schedule, it is recommended that the torch head be rebuilt at 500 plasma arc hours and replaced at 1,000 hours. This cycle continually repeats every 500 plasma arc hours, so at 500 and 1,500 plasma arc hours the torch will be rebuilt and at 1,000 and 2,000 hours it will be replaced.
Rebuilding the torch is a relatively simple task. Use the torch rebuild kit (part number 528106) to rebuild the torch. This kit includes everything you need, including 4 bullet plugs, 10 O-rings for the bullet plugs and coolant, a water tube, one large O-ring, one O-ring torch kit, and lubricant.
Before you begin, turn the power switch to the off position and make sure that the power-indicator LED is not illuminated on the plasma power supply. Use the instruction manual or scan the QR code included with the torch rebuild kit to obtain video instructions on how to proceed.
Remove the torch from the HPRXD receptacle move it to a clean workspace. Also make sure to wash your hands. Remove the retaining cap and cartridge from the torch and set them aside.
Using the torch-rebuild kit (528106) for torch maintenance, perform the following steps to disconnect the electrical power from the cutting system:
-
Set the line-disconnect switch to the OFF position.
-
Make sure that the power-indicator LED is not illuminated on the plasma power supply.
Next:
-
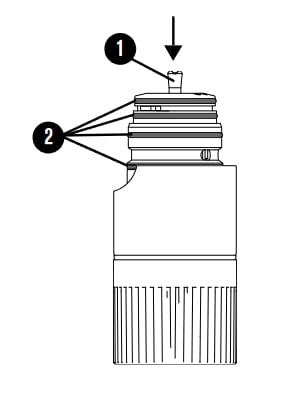
Start with the water tube (1). Install a new water tube by inserting it into the torch and pushing until it comes to a stop. The water tube will move slightly to align with the electrode in the cartridge.
-
Replace the four O-rings (2) on the front of the torch. Apply a thin layer of silicone lubricant to each O-ring before installation. Make sure that the O-rings look shiny, but that there is not too much lubricant.
-
Replace the single O-ring on the coolant-in connector (3). Apply a thin layer of silicone lubricant to each O-ring before installation. Make sure that the O-rings look shiny but do not have extra lubricant.

-
Replace two O-rings on each of the four bullet connectors (4) located on the rear of the torch. Use pliers to pull the old bullet connectors straight out. Apply a thin layer of silicone lubricant to each O-ring before installation. Make sure that the O-rings look wet, but without excess lubricant.
-
Install the new bullet connectors. Make sure that each bullet connector is fully installed, but do not use tools to push the bullet connectors into the slots. Tools can cause damage to the bullet connectors.
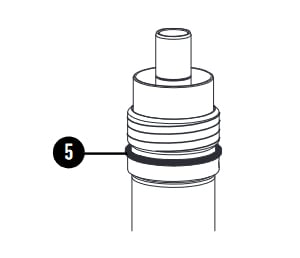 Replace the large O-ring on the HPRXD receptacle (5). Do not lubricate this O-ring. Unlike all the other O-rings we’ve discussed, this O-ring should not be lubricated. Remove the old O-ring and install the new O-ring. Make sure it is seated evenly.
Next, examine the cartridge and retaining cap and remove any contaminants. Install the cartridge by pushing it onto the torch and then install the retaining cap. Turn the retaining cap until it comes to a stop.
Finally, assemble the torch and HPRXD receptacle. To prevent damage, make sure to correctly align the torch and HPRXD receptacle and make sure that there is no space between the torch and the O-ring on the HPRXD receptacle. The torch body service is now complete.
Please review the HPR Cartridge Instruction Manual (810992) for the HPR cartridge torch maintenance and rebuild instructions, starting on page 33.
Your Hypertherm plasma cutting system requires proper maintenance. Adhering to the recommended maintenance outlined in your owner’s manual will help ensure you do not run your system with broken, worn, or dirty parts, maintaining productivity and cut quality while decreasing unplanned cutting disruptions and emergency repairs.