Powermax SYNC: Handheld cutting tips and tricks
by
When it comes to cutting metal, plasma cutting is one of the easiest processes to learn. Unlike oxyfuel, in which repeated practice is needed, most people can successfully cut metal within minutes, if not seconds, of picking up a plasma torch.
Although plasma cutting has always been easy, Hypertherm’s new cartridge consumable makes it even easier by eliminating the need to assemble a 5-piece consumable stack-up. Here are some tips and tricks for achieving the best result when hand cutting with a Powermax® SYNC and its SmartSYNC® torch.
Choose the correct cartridge
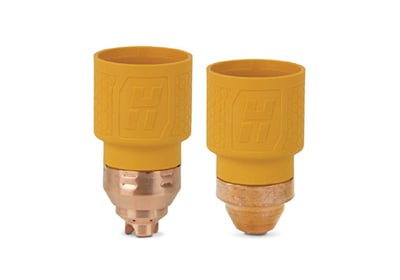
You’ll want to begin by choosing the correct cartridge. Hypertherm cartridges designed for handheld cutting are yellow to make them easy to identify. We make a cartridge with castellations at the tip for drag cutting and one with a smaller orifice, called FineCut®, for fine feature cutting. The drag cutting style is offered in three amperage levels while the FineCut cartridge is only offered at 45 amps.
Handheld cutting cartridge types
|
Style |
Amperage |
Part number |
|
Drag cutting |
85 amp 65 amp 45 amp |
428935 428931 428927 |
|
FineCut® |
45 amp |
428928 |
Once you’ve selected the correct cartridge for your job, screw it on to the front of your SmartSYNC® torch. The cartridge only requires a quarter turn to install so this will only take a few seconds. After that, turn on your system and move the switch on your torch to the green ON position.

Make any needed adjustments
The cartridge will automatically select the correct amperage and put the system into regular cutting mode. If you are cutting solid plate or pipe, you do not need to make any adjustments. If you plan to cut expanded metal, you will need to manually put the system into expanded metal mode by pressing the button on the front of your power supply.

Put on your PPE
Next put on your gloves, eye protection, and any other required personal protective equipment. You are now ready to cut!
Pick up your torch
Pick up your torch and place at the edge of the metal you need to cut. You will want to hold the torch so it is perpendicular to the workpiece.

Start your arc
When ready, move the black safety lever out of the way and press the red trigger to start your plasma arc.

Start cutting
Once your arc is established, you can begin to move your torch along the workpiece. There is no rule that specifies the direction in which you need to cut, but you’ll get the best results by pulling the torch back toward you, rather than pushing it forward.
Now, at this point, people new to plasma cutting generally have two questions: “Is it okay if my torch touches the metal?” and “How fast should I move my torch?”
The answer to the first question is yes. It is okay to rest your torch on the metal provided you are using a consumable cartridge designed for drag cutting. This is one of the things that makes plasma cutting easier than oxyfuel cutting. You do not need to hold any sort of standoff.
The answer to the second question depends on the type and thickness of your workpiece. Generally, you move your torch faster on thinner metal and slower on thicker metal. To determine the right travel speed, you will need to use the plasma sparks exiting your cut as a guide.
-
If the sparks spray up, the torch is moving too fast. When you move your torch too quickly, the plasma arc doesn’t have enough time to completely cut through the workpiece. The sparks cannot fall down into your cutting table because the arc is blocked by a solid piece of metal. You need to slow down so the arc has enough time to get through the workpiece.
-
If the sparks spray straight down, the torch is moving too slowly. Though it might seem like having the sparks spray straight down would be a good thing, it isn’t. If your sparks are falling straight down, the arc is spending too much time in one spot. Instead of simply cutting through the metal, it is also melting the metal and depositing low-speed dross on the edge of your cut part.
Ideally, you want the sparks to spray down, below the plate, at a 15-to-20-degree angle. This will give you the cleanest cut with the least amount of dross.
Though the above steps are great for edge-starting, you’ll want to use a slightly different method when piercing the plate.
Instead of starting with your torch perpendicular to the workpiece, hold your torch slightly above it at a 30-degree angle. Start your arc as described above and then slowly rotate your torch until it is perpendicular to the workpiece.

Continue to hold the trigger for a few seconds until the sparks exit from the bottom of the workpiece and then start cutting.
Learn more about Powermax SYNC
Related products
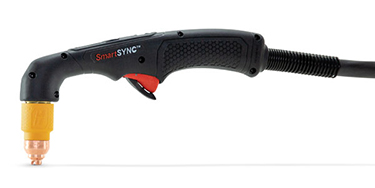
SmartSYNC torches
With simple, twist-on consumable installation, and convenient power and amperage adjustment controls on handheld models, SmartSYNC® torches for Hypertherm’s new Powermax65/85/105 SYNC® plasma systems allow the operator to change consumables and applications without returning to the power supply.