How to plasma cut - Covering some of the basics of cutting with air plasma
by

If you are new to plasma cutting, you may be wondering how to set up and use a plasma cutter to cut metal. This article will explain the basics of plasma cutting. We will cover:
- How to set up a plasma cutter
- How to use a plasma cutter
- How to plasma cut
This article will provide a high-level overview of how to set up and use a Powermax® air plasma cutter with a handheld plasma torch. It is not a replacement for the detailed information found in the operator’s manual for your plasma system. It does not cover mechanized cutting.
What you need to begin
One of the great things about air plasma cutters is their ease of use and versatility. Typically, all you need is:
- A plasma cutter like a Hypertherm Powermax® system
- Power supply, whether electricity from your wall or an appropriately sized generator
- Compressed or bottled air (unless you have a system with a built-in compressor like a Powermax30® AIR)
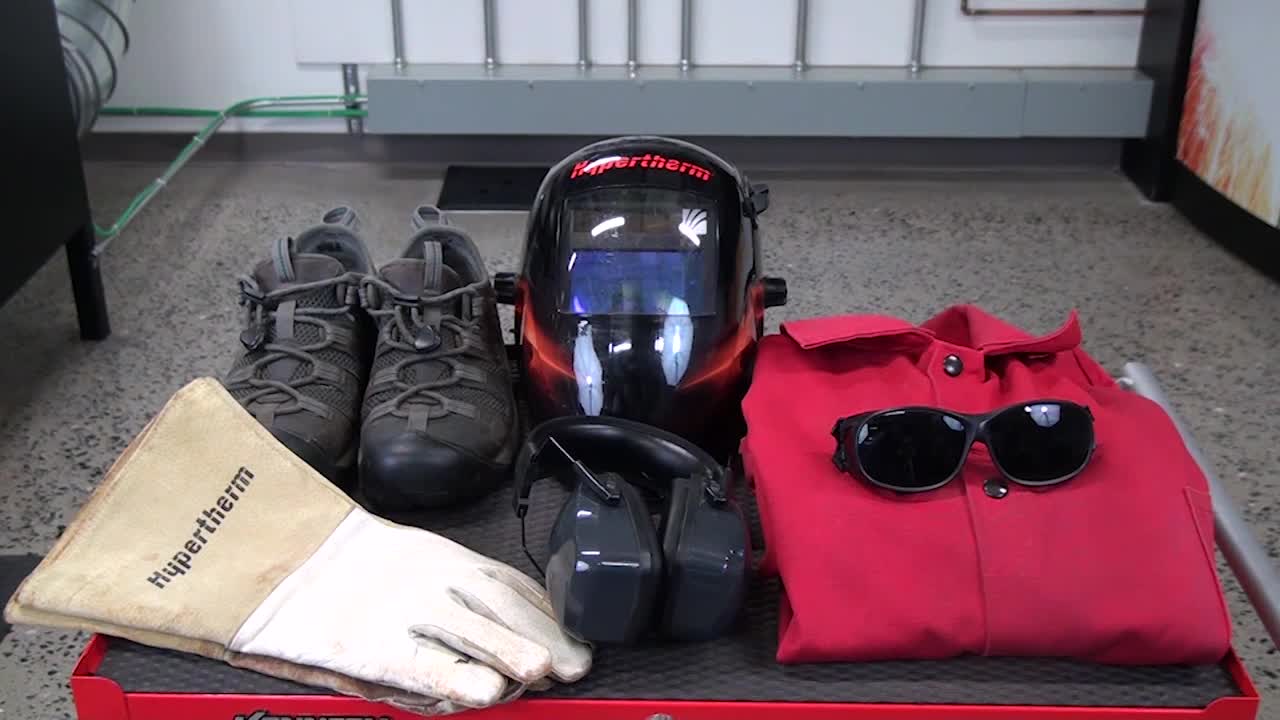
In addition to the above three things, you need to protect yourself by wearing personal protective equipment. The minimum equipment you need is:
- Heavy-duty welding / cutting gloves
- Dark shades with the minimum shade rating for the system you are using
- Protective fire-resistant jacket
- Closed toed shoes
We also recommend wearing ear plugs or something similar to protect your hearing.
How to set up a plasma cutter
Once you have everything you need to begin, you are now ready to set everything up. Here is how to set up a plasma cutter.
Step 1: Install your consumables or Hypertherm cartridge consumable onto your torch.
Step 2: Depending on the handheld torch model, move the torch lock switch found on your plasma torch to the “on” position.
Step 3: Plug your torch and work lead (aka grounding cable) into the front of the power supply.
Step 4: Attach the clamp on the work lead to your work surface, taking care to not attach the clamp to the metal that will fall away after it is cut.
Step 5: Connect the gas hose to the back of the system.
Step 6: Plug in your power cord and turn on your system. The power switch on most Hypertherm plasma cutters can be found on the back of the system.
How to use a plasma cutter
Now that you know how to set-up a plasma system, you are ready to learn how to use a plasma cutter. Powermax plasma cutters are able to cut and gouge metal. In addition, some systems, like our Powermax45® XP, can also mark metal.
How to plasma cut, edge starting

When using a handheld cutting torch, you can either start your cuts from the edge of the workpiece or you can start your cutting on the workpiece. Edge starting will provide you with longer consumable life. Here’s how to plasma cut when using an edge start.
Step 1: Select “cutting” using the mode control on the front of your system.
Step 2: Turn the amperage knob on the front of your system to the appropriate amperage for the thickness of metal you are cutting.
Note: If you have a Powermax SYNC® system you can skip both of the above steps since the system will automatically select the correct mode and amperage based on the cartridge you have installed.
Your owner’s manual contains cut charts that list a recommended amperage for a given thickness. Generally, to get the best cut quality and consumable life, you want to use a lower amperage for thinner metal and a higher amperage for thicker metal.
Step 3: Pick up and position your torch vertically just off the edge of the workpiece
If applicable, check to be sure your torch lock switch is off, then pull the trigger to initiate the plasma arc.
Step 4: Pause your torch on the edge of the workpiece until the arc has completely cut through the workpiece, then proceed with the cut by moving your torch at a steady speed.
Step 5: When you have completed most of the cut and are nearing the other edge, slightly tilt or angle your torch handle upwards so that the arc exits the workpiece first. This will ensure you get a complete cut.
Though you can simply place your torch on the metal and cut free-hand, a torch cutting guide, straight edge, or template can help you to make more exact cuts. You can also use a circle cutting guide to cut out holes.
How to plasma cut, piercing thin material

Though edge starting will provide you with the best consumable life, it is often necessary to start your cutting on the workpiece by piercing the workpiece. Here’s how to plasma cut when using the pierce method on thin material using a straight piercing technique.
Step 1: Hold your torch over the area you want to pierce.
Step 2: If applicable, check to be sure your torch lock switch is off, then pull the trigger to initiate the plasma arc and start your cutting.
How to plasma cut, piercing thick material

Ideally, you should use a slightly different method when piercing thicker material. Here’s how to plasma cut when using the pierce method on thick material using a rolling piercing technique
Step 1: Hold your torch over the area you want to pierce.
Step 2: Tilt your torch so it is at a roughly 25-degree angle to the workpiece.
Step 3: If applicable, check to be sure your torch lock switch is off, then pull the trigger to initiate the plasma arc.
Step 4: Once cutting starts, rotate your torch to an upright position. Once the arc has pierced through the metal you can make your cut.
How to plasma gouge
In addition to learning to how to plasma cut, you can also learn how to gouge with plasma. Here’s how to plasma gouge.
Step 1: If applicable, turn your torch lock switch to off. Insert gouging consumables or a green gouging cartridge onto your torch and then return your torch lock switch to the on position.
Step 2: Select “gouging” using the mode control on the front of your system.
Step 3: Turn the amperage knob on the front of your system to the appropriate amperage for the type of gouge you want to create, more on this below.
Note: If you have a Powermax SYNC system you can skip both of the above steps since the system will automatically select the correct mode and amperage based on the cartridge you have installed.
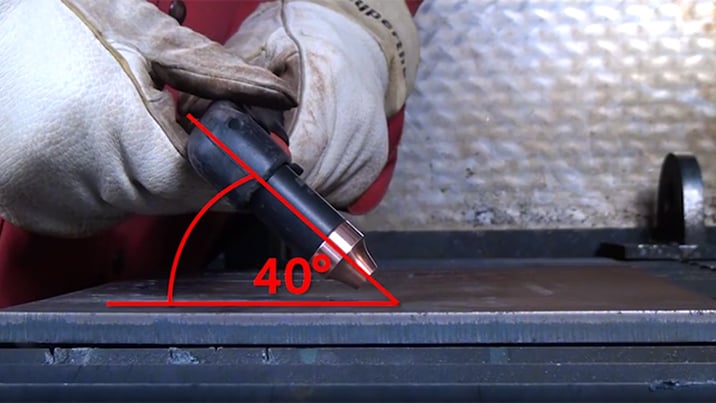
Step 4: Place the torch at an approximately 40-degree angle to the workpiece, holding a small gap between the torch and workpiece, press the trigger and then move the torch along the workpiece to create your gouge.
You can control depth and width of your gouge in several ways.
- Amperage: A higher amperage will result in a wider gouge, while a lower amperage will result in a narrower gouge.
- Torch angle and speed: A steeper angle and slower forward movement will result in a deeper gouge, while a lower angle and faster forward movement will create a shallower gouge.
- Arc stretch: The distance between your torch and the workpiece can also impact the gouge your achieve. If you hold your torch close to the workpiece, so your arc is short, you will wind up with wider gouge. If you hold your torch further from the workpiece, so your arc is longer, you will wind up with a narrower gouge.
- Consumables: Hypertherm offers several gouging consumables or cartridges that vary the depth and width of the gouge. For example, our max control style allows for very precise metal removal, while our max removal style is designed for aggressive metal removal.
Now you know at a high-level how-to set-up a plasma cutter, how to use a plasma cutter, and how to plasma cut and gouge.