Plasma cutter problems- starting problems
WARNING: Plasma cutter maintenance and repair should only be attempted by those skilled in electrical troubleshooting. Plasma cutting systems use high voltage and direct-current (DC) electricity. Electric shock can injure or kill.
Symptoms of Starting Problems
Whether you are new to mechanized plasma cutting or you’re a pro using a high amp CNC plasma table, starter problems can occur with the plasma cutting machine. The torch fails to initiate the cutting arc when all other conditions for normal operation are correct—power supply energized, safety and parts-in-place interlocks satisfied, gas pre-flow at torch, and torch within transfer distance.
The sequence of operation for the typical plasma cutter is as follows:
- The start-cut signal is sent to the power supply to energize the system.
- A solenoid opens, allowing gas flow to the torch.
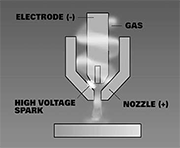
- The pilot-arc relay latches, activating open-circuit voltage (OCV) between the nozzle (+) and the electrode (-).
- A high-frequency (HF) spark (see illustration 1) is supplied to the torch by a high-voltage generator with 3,000-10,000 V AC output. The high-frequency generator usually includes a high-voltage transformer, capacitors, spark-gap assembly, and coil.
- The high-frequency spark ionizes the gas flowing through the torch, making it electrically conductive. The ionized gas allows current flow between the electrode and nozzle. This current is limited to 20-40 A DC by the pilot resistor.
- The plasma arc blows out of the orifice and reattaches to the face of the nozzle, forming a pilot arc (see illustration 2).
- The pilot arc forms the electrical pathway to the workpiece. If the torch is within transfer distance, usually 0.25 to 0.50 inch from the material, the pilot arc will transfer to the plate since the plate is connected to the positive pole of the DC circuit and is not limited by a resistor (see illustration 3).
- A current-sensing circuit senses arc transfer, shuts off the HF generator, and opens the pilot-arc relay.
In simple terms, the torch needs three ingredients to form a pilot arc:
- Plasma gas
- DC power
- AC high frequency.
With any of these ingredients missing, the torch will not fire, transfer, or cut.
Illustration 1
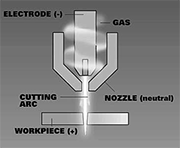
Illustration 2
Illustration 3
Troubleshooting starting problems
Issues with starting is a common problem. When starting problems occur, the operator should first evaluate the pilot arc. Raise the torch several inches above the material to provide a good, clear view of the torch. Then signal the torch to fire. After several seconds of gas flow, a pilot arc should form at the torch. A healthy pilot arc will sustain itself in the air for several seconds. Look for an arc with a bright white-blue color that projects 0.25-0.50 inch from the end of the nozzle. The arc should not spit and sputter or sound raspy; it should be smooth and steady. He should test the pilot arc a number of times in the air to see if the condition repeats.
Problem 1: Hard starting
If the pilot arc spits and sputters but fires intermittently, the problem may be hard starting. Hard starting occurs when the HF struggles to break down the high-pressure barrier between electrode and nozzle. This can be caused by insufficient HF or excessive gas pressure.
Here are four steps to remedy hard starting.
- Check the gas pressure and flow. The plasma gas pressure or air flow setting should not exceed factory- recommended settings. Excess pressure in the plasma chamber makes it harder for the HF spark to jump the gap, so that the pilot arc is effectively blown out before it can fully establish. High-gas pressure accounts for the majority of hardstarting problems, and is often overlooked— a zealous troubleshooter might replace every component in the pilot circuit, only to find the air pressure had been turned too high.
- Clean the hoses and wires that carry gas and power to the torch, and inspect them for visible damage or loose connections. If the shielding is covered with dirt, metal dust, or moisture, the high-frequency energy can be dissipated. Blow off the leads with an air hose or wipe them down with a clean cloth. Eliminate any coils in the leads—they can cause a large inductance. Insulate the leads from the cutting machine.
- Inspect, clean, and regap the spark-gap assembly. High frequency from the high-voltage generator is usually sent to capacitors that discharge the electricity across a spark-gap assembly. Over time the spark-gap electrodes can deteriorate or become contaminated with metal dust and dirt. Prior to causing starting problems, contamination can cause issues with cut quality. Clean and re-gap the electrodes to the manufacturer's specifications. Gap should be 0.015 to 0 .030 inch, depending on the system.
- If using a water-cooled torch, check coolant resistivity. For most systems it should be less than 10 Kohms/cm or 10 micromhos.
Problem 2: Weak, blue spark at torch
If there is a visible spark at the cutting torch but it is a small blue spark that looks similar to the spark at the spark-gap points, then the pilot arc has high frequency but no DC component. The most likely causes for loss of DC in the pilot arc are worn contacts or a bad coil in the pilot-arc relay; or a defective pilot resistor.
Problem 3: No spark visible at torch or at spark gap
No AC power to high voltage generator; defective high-voltage generator; defective capacitors; shorted or damaged spark-gap assembly.
Problem 4: No spark at torch, spark at spark gap, severe hard starting
Refer to problem 1; shorted or open torch lead; shorted or open connection in torch body.